Acura | Honda
Contents
hide
Powertrain
Engine
Throttle Body
📝 P2101 ETCS Malfunction | Dirty Throttle Plate | 2014 Acura RLX
- P2101 ETCS System Malfunction
- Prior to cleaning, in ECM Live Data “TB opening angle” was no lower than 2 degrees with “Motor Duty” about -60%.
- ECM had a hard time keeping TB closed.
- After cleaning, “TB opening angle” became 1 degree, “Motor Duty” about -17%
Fuel Delivery
Transmission
- New TCM will need to be reprogrammed through J2534 (17’ civic).
- Otherwise, PCM will have a code about communication issues with tranny and the shifter indicator will be off.
Chassis
ABS | Traction Control
📝 U3000:49, ABS Internal | ABS Components Mismatch | 2016 Honda Civic
- U3000:49 Control Module: Internal Electronic Failure
- When only the ABS module (black part) has been replaced without the ABS pump part (even when part numbers match), it will give the U3000:49 code.
- When ABS Module and Pump are from the same assembly, code disappears.
- Looks like it’s somehow tied to the original pressure sensor.
📝 84-01 Sensor Logic Failure | Bad Yaw Rate Sensor | 2006 Acura MDX
- 2006 Acura MDX with VSA DTC 84-01 Sensor Logic Failure. Won’t calibrate. Yaw rate sensor data showed 126 degrees/ second
📝 Random self-steering to the right | Faulty Yaw Rate Sensor | 2004 Acura TSX
- The car would very randomly and very suddenly steer to the right. The customer almost got into an accident a few times. ABS had no codes. Turned out that the Yaw Rate Sensor occasionally gave the wrong signal to the ABS Module, making it falsely think that the car is skidding. A new sensor fixed the problem.
Suspension
Active Damper System (ADS) Struts Bypass
- When converting ADS struts to regular struts (usually much cheaper), place 2Ω 10W resistor inside each connector for ADS front struts to bypass the now missing electrical damper part.
- Fixes the “7-9 active damper control unit internal circuit malfunction” code in the ADS unit and light on a dash (e.g. 2010 MDX)
TPMS
-
📎 U3000 TPMS Unit Internal Malfunction | 2016 RDX
- Don’t replace TPMS Unit just yet
- Could be caused by a weak battery
- Reprogram TPMS Sensors and drive the vehicle
- The TPMS light might turn off (2016 RDX)
Body
ECM & Immobilizer Programming
Read more ➱ Immobilizer
Airbag System 
Go to ➯ Airbag (SRS) and SWS Systems in Honda & Acura
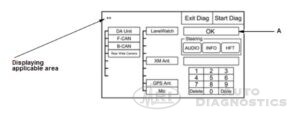
📝 Stuck in Diagnostic Mode | 2020 Honda HRV
- Note, If the vehicle left the factory in the Factory Diagnostic Mode, you will see this screen every time you turn the vehicle to the ON mode. Sometimes this screen also appears after you replace the audio unit with a new or remanufactured unit. Normally the factory does the steps necessary to verify proper operation and terminate the factory diagnosis. Until the proper confirmation sequence is done, the screen appears every time you turn the vehicle to the ON mode.

- (A) will show OK only when all other boxes will light up with green color.
- Notice the Steering section with Audio, Info, HFT buttons. They will turn green when you press appropriate audio buttons on the steering (assuming those systems work properly).
- When (A) displays OK, you can click on Exit Diag to exit Factory Diagnostic Mode. Otherwise, that button is inactive.
Battery | Charging
Battery Drain
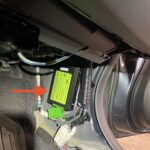
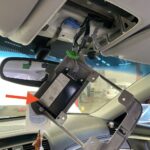
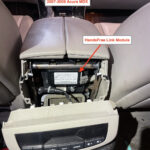
HandsFreeLink (HFL) Module
Very common on older Acuras, where HFL module doesn’t go to sleep when the car is off, draining the battery. Frequently this parasitic draw is periodically jumping between 0 – 200mA, so while testing with an ammeter, make sure to watch it over a few minutes timespan.
Power Door Locks | Tailgate | Sliding Doors | Convertible Top
-
📝 Power Tailgate Inop | 2014 Honda Odyssey
- Tailgate would not operate when it doesn’t see tailgate latch properly closed.
- Even after the latch issue is fixed, tailgate needs to be lifted up manually (to reset itself), and only then the power tailgate function will start working.
-
📎 Tailgate Inoperative | Bad Unlock Knob Switch | 2009 Honda Odyssey
- Tailgate would not open.
- After manually unlocking tailgate, power tailgate operates normally until you close it and it latches it. After that it doesn’t even try to unlock it.
- Here is a requirements for OPEN operation:
- tailgate is fully closed.
- Full latch and Half latch switches are OFF. Ratchet switch is ON.
- Release and Neutral switches are OFF too, but they are not used to determine whether latch is closed or open.
- Drivers door AND passenger door is unlocked. Information is transmitted through B-CAN. Values can be checked with a scan tool.
- Shift lever in P
- Closer unit detects a neutral position
- Vehicle speed is less than 1.2 mph
- Battery voltage is more than 11V
- System is not in Fail safe mode
- tailgate is fully closed.
- Problem was with a passenger unlock knob switch.
- Even though all doors where physically unlocked, MICU didn’t see passenger unlock knob switch reporting UNLOCKED.
- After bypassing that switch, tailgate immediately started working.
- Note: After locking all doors, and unlocking, if drivers and passengers unlock knob switches are not ON, tailgate stops working again.
Windows, Sunroof
📎 Windows Reset/ Initialization
- [ 2019 Honda Civic, 2020 Acura TLX, … ]
- HDS ➱ Body Electrical ➱ Power Windows ➱ Adjustment ➱ Power Window Reset for [Driver, Passenger] Side
Driver Assistance | ADAS
Parking Assistance
Parking Sensor Reset | Newer Acura & Honda (2016-up)
- After replacing sensor, you need to perform manual parking system reset procedure.
- e.g. 2016-2017 Acura RDX, 2019-2020 MDX.
- Erasing codes will not help, it will falsely condemn parking sensors
- B2618 (front 1st sensor data failure)
- B2619 (front 2nd sensor data failure)
- B261A (front 3rd sensor data failure)
- B261B (front 4th sensor data failure)
- B261C (rear 1st sensor data failure)
- B261D (rear 2nd sensor data failure)
- B261E (rear 3rd sensor data failure)
- B261F (rear 4th sensor data failure)
- Reset Procedure
- NOTE: Before starting this procedure, make sure that all of the parking and back-up sensors are connected.
- 1. Set the power mode to ON.
- 2. Press and release the Parking and Backup Sensor button 10 times within 10 seconds . The indicator in the button will start to blink.
- 3. Set the power mode to OFF.
- 4. While pressing and holding the Parking and Backup Sensor button, set the power mode to ON and wait for 10 seconds . If the reset is successful, the buzzer will sound for 2 seconds . Release the button.
- 5. Press and release the Parking and Backup Sensor button and make sure the system works normally.


